You may have written some truly fine software, but it can't impress the hiring committee or gain users if it's not deployed onto a server. Often PaaS products (platform-as-a-service) like Heroku are touted as the best choice for indie hackers because they are easy to use. That's a debatable claim that assumes you are okay with paying to host each app separately. If you're building up a portfolio or trying many small projects to see what sticks, you may save money—and learn some valuable skills—by running those apps on a single $5/month server.
Creating a Firewall
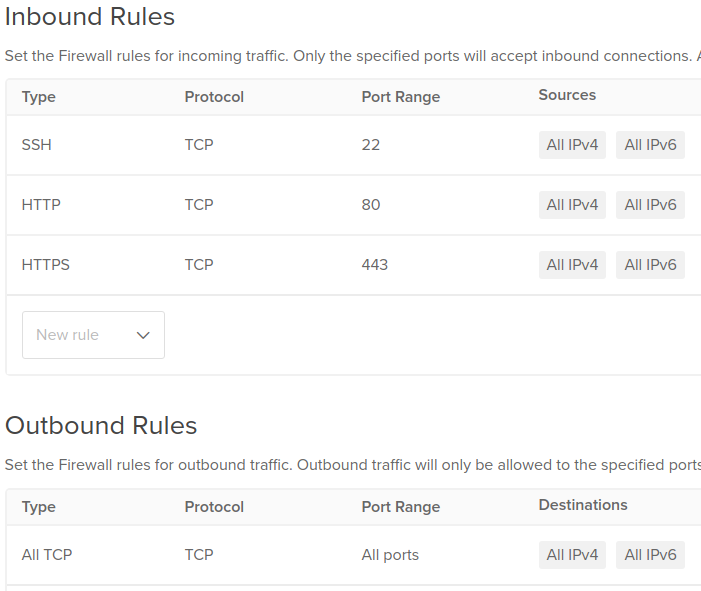
First we want to create a firewall rule so we can quickly apply it to our server, once it exists. I recommend Digital Ocean (referral link) as a cloud provider for a cleaner, simpler interface compared to AWS. Once you have an account, create a firewall under the Networking section. We want to allow SSH traffic and HTTP(S) traffic. You will apply the firewall to the server after they both have been created.
Getting and Accessing a Server
Digital Ocean calls its servers "droplets", so create one of those next. Pick "Ubuntu", "Shared CPU" and the $5/month machine for the cheapest and easiest server to use.
Under Authentication, pick "SSH keys." Follow the instructions to create or add an SSH key to the account.

Once you have a server, copy the IP address for use later. It should be on the screen in front of you already. No matter which cloud provider you use, if you supplied an SSH key while creating a server then SSH access using that key should be set up.
Start your first SSH session with the new server:
$ ssh -i path/to/your_private_ssh_key root@your_server_ip_address
Welcome to Ubuntu 20.04.1 LTS (GNU/Linux 5.4.0-51-generic x86_64)

 * Documentation:  https://help.ubuntu.com
 * Management:     https://landscape.canonical.com
 * Support:        https://ubuntu.com/advantage

  System information as of Wed Feb 10 19:38:33 UTC 2021

  System load:  0.09              Users logged in:       0
  Usage of /:   5.1% of 24.06GB
  Memory usage: 19%
  Swap usage:   0%
  Processes:    102
Instead of typing that out in the terminal every time you want to use SSH, edit your config file:
Host mydroplet
	HostName your_server_ip_address
	User root  # eventually consider setting up non-root access--for now let's keep going
	IdentityFile path/to/your_private_ssh_key
Now you can access the server with
$ ssh mydroplet
Updating and Securing a Server
The first thing we want to do is to secure our server. In the Digital Ocean user interface, add your droplet to the firewall rule we set up earlier in the Networking section. Now only ports 22, 80, and 443 can receive traffic.
Next, update all software on your server. In an SSH session, run:
# apt-get update -y && apt-get dist-upgrade -y && apt-get -y autoremove
# # if you are shown any prompts about file merge conflicts, choose to keep the currently installed version
Opening an SSH session with your server requires the SSH key, which only you have. This is very secure already, but also I like to install fail2ban to block anyone trying to brute-force their way onto the server:
# apt-get install fail2ban
Running the Caddy Webserver
Let's get a webserver. NGINX is the industry standard that I used to prefer, but lately I'm using Caddy which prioritizes the developer experience. Follow its installation guide for Ubuntu (or build from source if you're comfortable with Go):
# apt install -y debian-keyring debian-archive-keyring apt-transport-https
# curl -1sLf 'https://dl.cloudsmith.io/public/caddy/stable/gpg.key' | sudo apt-key add -
# curl -1sLf 'https://dl.cloudsmith.io/public/caddy/stable/debian.deb.txt' | sudo tee -a /etc/apt/sources.list.d/caddy-stable.list
# apt update
# apt install caddy
See that the server is running and note the location of its config file in /etc/caddy/Caddyfile:
# systemctl status caddy.service
● caddy.service - Caddy
     Loaded: loaded (/lib/systemd/system/caddy.service; enabled; vendor preset: enabled)
     Active: active (running) since Wed 2021-02-10 20:02:48 UTC; 1min 35s ago
       Docs: https://caddyserver.com/docs/
   Main PID: 35344 (caddy)
      Tasks: 6 (limit: 1137)
     Memory: 9.7M
     CGroup: /system.slice/caddy.service
             └─35344 /usr/bin/caddy run --environ --config /etc/caddy/Caddyfile
Running your Application
Next you need to get the server to a state where you can run a command that launches your application listening on some port. If you work in Ruby, Python, or Node that will look like:
- Install Ruby/Python/Node
- Get your files onto the server with
git cloneorscp, etc. - Install Ruby/Python/Node dependencies
- Set up any database or files your app requires
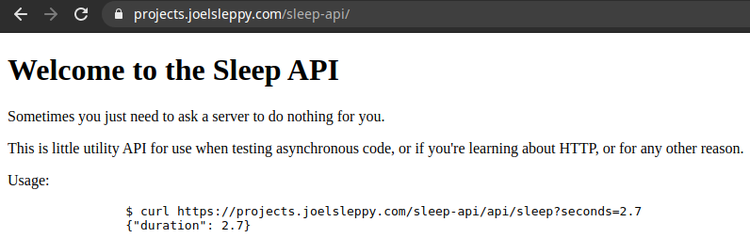
I'm using Go here, so I just have to copy a single executable file to my server. I'm making a little Sleep API, so my executable is sleepapi.
To register the service with Systemd, write a file like this:
[Unit]
Description=Sleep API
Documentation=https://sleepapi.joelsleppy.com/
After=network.target network-online.target
Requires=network-online.target

[Service]
User=joel
Group=joel
ExecStart=/home/joel/sleep_api/sleepapi
Environment=PORT=8001
TimeoutStopSec=70s
LimitNOFILE=1048576
LimitNPROC=512

[Install]
WantedBy=multi-user.target
Replace the filename and other names (user, group, description) as appropriate. ExecStart is the command that starts your application. Environment specifies environment variables, in this case which port the app will listen on. You don't have to use environment variables here, but you do need to know which port the app is using for later.
Then, start your service:
# systemctl enable sleepapi.service
# systemctl start sleepapi.service
# systemctl status sleepapi.service
● sleepapi.service - Sleep API
     Loaded: loaded (/etc/systemd/system/sleepapi.service; enabled; vendor preset: enabled)
     Active: active (running) since Wed 2021-02-10 20:53:46 UTC; 19h ago
       Docs: https://sleep-api.joelsleppy.com/
   Main PID: 43049 (sleepapi)
      Tasks: 4 (limit: 1137)
     Memory: 1.0M
     CGroup: /system.slice/sleepapi.service
             └─43049 /home/joel/sleep_api/sleepapi

Feb 10 20:53:46 projects systemd[1]: Started Sleep API.
Feb 10 20:53:46 projects sleepapi[43049]: 2021/02/10 20:53:46 Listening on port 8001
Right now we have Caddy and your App running, and Caddy is accessible from the Internet. All we need to do is finish the connection between Caddy and your app.
+----------+    +-------+   +----------+
|          +--->+       |   |          |
| Internet |    | Caddy |   | Your app |
|          +<---+       |   |          |
+----------+    +-------+   +----------+
Edit the Caddy config to look something like this:
# We haven't covered pointing a domain name at your server, but it would go here
sleep-api.joelsleppy.com {
        reverse_proxy 127.0.0.1:8001
}
Then run systemctl reload caddy.service. If all went well, your app should be accessible to the Internet!
In my case, the static HTML page is served here https://sleep-api.joelsleppy.com/ and an example call to the Sleep API is https://sleep-api.joelsleppy.com/sleep?seconds=2.7.
$ time http https://sleep-api.joelsleppy.com/sleep?seconds=13
HTTP/1.1 200 OK
Content-Length: 15
Content-Type: application/json
Date: Thu, 11 Feb 2021 17:04:21 GMT
Server: Caddy

{
    "duration": 13
}


real	0m13.433s